How to use HTTPS Client in iOS app using AFNetworking

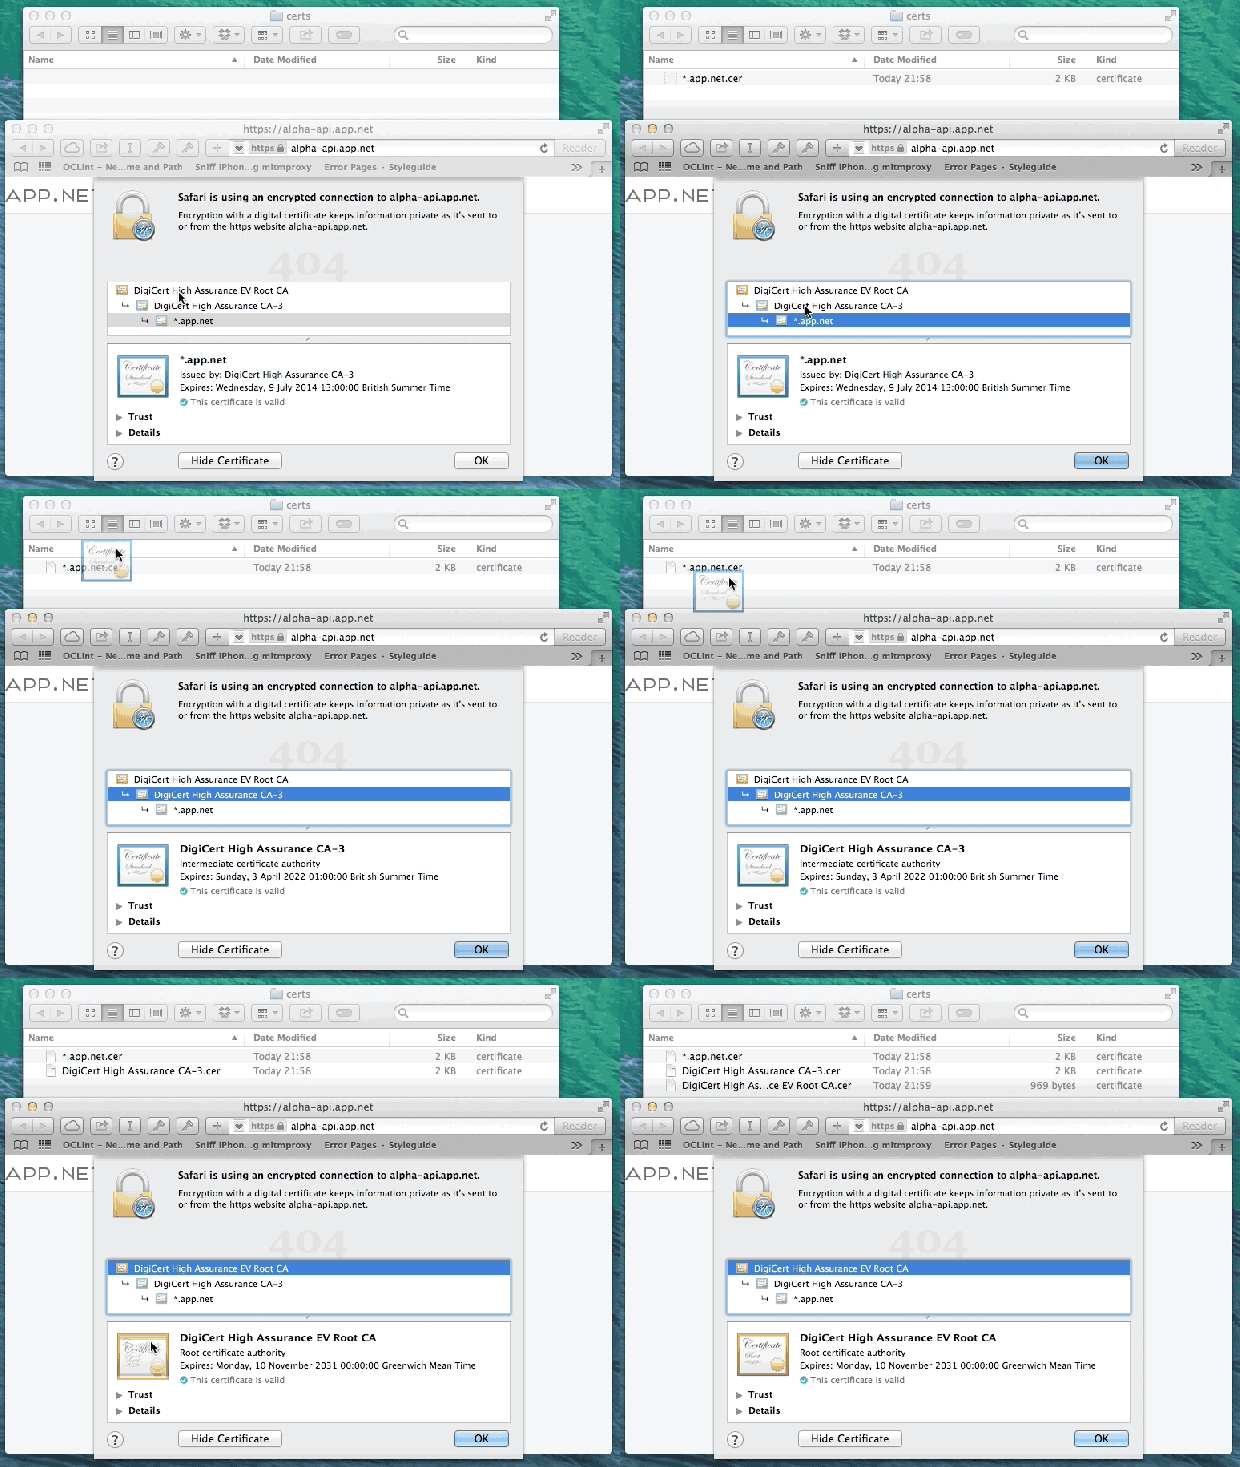
1. Get your website certificate:

cert

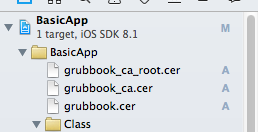
2. Put all your certificates to your project bundle:

Screen Shot 2014-11-07 at 17.00.38


3. Setup sercurityPolicy in your client

– In AFCustomClient.h

@interface AFCustomClient : AFHTTPRequestOperationManager

+ (AFCustomClient *)shareClient;

- (instancetype)initWithBaseURL:(NSString *)url;

– In AFCustomClient.m

- (instancetype)initWithBaseURL:(NSString* )url
{
    self = [super initWithBaseURL:[NSURL URLWithString:url]];

    if (self) {
        self.responseSerializer = [AFHTTPResponseSerializer serializer];
        self.requestSerializer = [AFHTTPRequestSerializer serializer];

        AFSecurityPolicy * sercurity = [AFSecurityPolicy policyWithPinningMode:AFSSLPinningModeCertificate];
        self.securityPolicy = sercurity;
    }
    return self;
}

Rate us button

private boolean MyStartActivity(Intent aIntent) {
    try
    {
        startActivity(aIntent);
        return true;
    }
    catch (ActivityNotFoundException e)
    {
        return false;
    }
}
//On click event for rate this app button
public void btnRateAppOnClick(View v) {
    Intent intent = new Intent(Intent.ACTION_VIEW);
    //Try Google play
    intent.setData(Uri.parse("market://details?id=[Id]"));
    if (!MyStartActivity(intent)) {
        //Market (Google play) app seems not installed, let's try to open a webbrowser
        intent.setData(Uri.parse("https://play.google.com/store/apps/details?[Id]"));
        if (!MyStartActivity(intent)) {
            //Well if this also fails, we have run out of options, inform the user.
            Toast.makeText(this, "Could not open Android market, please install the market app.", Toast.LENGTH_SHORT).show();
        }
    }
}

Dialog Fragment – Time Picker Wheel Dialog

1. TimePickerWheel Android

PickerWheel library:
TimePicker class :

import java.util.Calendar;

import kankan.wheel.widget.OnWheelChangedListener;

import kankan.wheel.widget.OnWheelClickedListener;

import kankan.wheel.widget.OnWheelScrollListener;

import kankan.wheel.widget.WheelView;

import kankan.wheel.widget.adapters.NumericWheelAdapter;

import android.app.Dialog;

import android.content.Context;

import android.os.Bundle;

import android.support.v4.app.DialogFragment;

import android.view.View;

import android.view.View.OnClickListener;

import android.view.Window;

import android.widget.Button;

import android.widget.TextView;

import cst.com.gbmerchant.R;

import cst.com.gbmerchant.myinterface.SetTimeForView;

public class TimePickerWheel extends DialogFragment{

// Time changed flag

privateboolean timeChanged = false;

// Time scrolled flag

private boolean timeScrolled = false;

Dialog d;

Context context;

SetTimeForView timeSet;

TextView tv_hours;

TextView tv_minutes;

public TimePickerWheel(Context context, SetTimeForView timeSet){

d = new Dialog(context);

this.context = context;

this.timeSet = timeSet;

}

@Override

public Dialog onCreateDialog(Bundle savedInstanceState) {

d.requestWindowFeature(Window.FEATURE_NO_TITLE);

d.setContentView(R.layout.fragment_time_picker);

final WheelView hours = (WheelView) d.findViewById(R.id.hour);

hours.setViewAdapter(new NumericWheelAdapter(context, 0, 59, “%02d”));

hours.setCyclic(true);

final WheelView mins = (WheelView) d.findViewById(R.id.mins);

mins.setViewAdapter(new NumericWheelAdapter(context, 0, 59, “%02d”));

mins.setCyclic(true);

tv_hours = (TextView) d.findViewById(R.id.tv_timePicker_hours);

tv_minutes = (TextView) d.findViewById(R.id.tv_timePicker_minutes);

Button btnSetTime = (Button) d.findViewById(R.id.btn_timePicker_setTime);

// set current time

//Calendar c = Calendar.getInstance();

//int curHours = c.get(Calendar.HOUR_OF_DAY);

//int curMinutes = c.get(Calendar.MINUTE);

int curHours = 0;

int curMinutes = 30;

hours.setCurrentItem(curHours);

mins.setCurrentItem(curMinutes);

tv_hours.setText(curHours + “”);

tv_minutes.setText(curMinutes + “”);

// add listeners

addChangingListener(mins, “min”);

addChangingListener(hours, “hour”);

OnWheelChangedListener wheelListener = new OnWheelChangedListener() {

public void onChanged(WheelView wheel, int oldValue, int newValue) {

if (!timeScrolled) {

timeChanged = true;

tv_hours.setText(hours.getCurrentItem() + “”);

tv_minutes.setText(mins.getCurrentItem() + “”);

timeChanged = false;

}

}

};

hours.addChangingListener(wheelListener);

mins.addChangingListener(wheelListener);

OnWheelClickedListener click = new OnWheelClickedListener() {

public void onItemClicked(WheelView wheel, int itemIndex) {

wheel.setCurrentItem(itemIndex, true);

}

};

hours.addClickingListener(click);

mins.addClickingListener(click);

OnWheelScrollListener scrollListener = new OnWheelScrollListener() {

public void onScrollingStarted(WheelView wheel) {

timeScrolled = true;

}

public void onScrollingFinished(WheelView wheel) {

timeScrolled = false;

timeChanged = true;

tv_hours.setText(hours.getCurrentItem() + “”);

tv_minutes.setText(mins.getCurrentItem() + “”);

timeChanged = false;

}

};

hours.addScrollingListener(scrollListener);

mins.addScrollingListener(scrollListener);

btnSetTime.setOnClickListener(new OnClickListener() {

@Override

public void onClick(View v) {

handleSetTime();

}

});

return d;

}

private void handleSetTime(){

String h = tv_hours.getText().toString();

String m = tv_minutes.getText().toString();

timeSet.setTimeForView(h, m);

this.dismiss();

}

private void addChangingListener(final WheelView wheel, final String label) {

wheel.addChangingListener(new OnWheelChangedListener() {

public void onChanged(WheelView wheel, int oldValue, int newValue) {

//wheel.setLabel(newValue != 1 ? label + “s” : label);

}

});

}

}


Design Pattern – Observer

Nó là gì ?

Observer cho phép các đối tượng có thể lắng nghe và phản ứng khi có thông báo từ một đối tượng khác. Tức là khi một đối tượng gửi một thông báo, các đối tượng lắng nghe nó có thể phản ứng lại với thông báo đó.

Sử dụng khi nào ?

Khi bạn muốn các đối tượng liên lạc với nhau. Khi đối tượng này gửi 1 thông điệp thì các đối tượng đăng ký lắng nghe thông điệp sẽ phản ứng lại với thông điệp đó. Đối tượng gửi thông điệp sẽ không cần biết nó sẽ gửi cho ai và đối tượng nhận thông điệp sẽ không cần biết ai gửi thông điệp đó.

Dùng nó như thế nào ?

Giả sử trong một hệ thống bán hàng, mỗi khi có sản phẩm mới hệ thống sẽ thông báo cho tất cả các khách hàng quan tâm đến sản phẩm này. Đầu tiên tôi tạo ra một lớp interface với 1 phương thức sẽ phản ứng khi có sản phẩm mới .

  1. public interface Observer{
  2.    void update(String message);//phương thức phản ứng lại khi nhận được thông báo.
  3. }

Và lớp Customer sẽ triển khai interface trên :

  1. public class Customer implements Observer{
  2. private String name;
  3. private int age;
  4. public Customer(String name, int age) {
  5. super();
  6. this.name = name;
  7. this.age = age;
  8. }
  9.  
  10. @Override
  11. public void update(String message) {
  12. System.out.println(name + ” ” + message);
  13. }
  14.  
  15. }

Tiếp theo tạo một interface với các phương thức, cho phép đối tượng Observer đăng ký phản ứng, hủy đăng ký nhận, và thông báo đến tất cả các đối tượng Observer đã đăng ký :

  1. public interface Subject {  
  2.     public void attachObserver(Observer observer);// thêm đối tượng đăng ký lắng nghe thông báo.
  3.     public void detachObserver(Observer observer);// hủy đối tượng đăng ký lắng nghe thông báo
  4.     public void notifyObserver();//thong bao đến tất cả các đối tượng đã đăng ký thông báo.
  5. }

Và class Product sẽ triển khai interface trên:

  1. public class Product implements Subject{
  2. private List<Observer> obs = new ArrayList<Observer>();
  3. private String nameProduct;
  4. public Product(String nameProduct) {
  5. super();
  6. this.nameProduct = nameProduct;
  7. }
  8.  
  9. @Override
  10. public void attachObserver(Observer observer) {
  11. obs.add(observer);
  12. }
  13.  
  14. @Override
  15. public void detachObserver(Observer observer) {
  16. obs.remove(observer);
  17. }
  18.  
  19. @Override
  20. public void notifyObserver() {
  21. for(Observer ob : obs){
  22. ob.update(nameProduct);
  23. }
  24. }
  25. }

Ok đến đây ta đã có một class có thể thông báo đến các observer và observer sẽ phản ứng lại với thông báo này. Tạo hàm main như sau:

  1. public class Main {
  2. public static void main(String[] args) {
  3. Customer cus1 = new Customer(“Ti”, 11);
  4. Customer cus2 = new Customer(“Teo”, 12);
  5. Product product1 = new Product(“Laptop”);
  6. product1.attachObserver(cus1);//cus1 dang ky phan ung khi có thông báo từ product
  7. product1.attachObserver(cus2);
  8. product1.notifyObserver();//thông báo đến tất cả các Observer.
  9. }
  10. }

Oke vậy đã xong Observer.

Design Pattern – Adapter

Tiếp tục với mẫu thiết kế adapter.

Nó là gì?
Mẫu adapter chuyển đổi giao diện thành một giao diện khác mà phù hợp với yêu cầu. Giúp kết nối các lớp có giao diện không tương thích để làm việc với nhau

Dùng nó trong trường hợp nào?.
Khi ta muốn chuyển đổi một lớp với một giao diện thành giao diện mà ta mong muốn.
Xậy dựng, mở rộng các phương thức của lớp có sẵn phù hợp với yêu cầu.
Tái sử dụng giao diện cũ. Giảm thiểu việc viết lại mã lệnh.

Dùng nó như thế nào?

Tình Huống:

  Thực tế : Có một công ty muốn mỏ rông công ty bằng cách chuyển địa điểm làm việc. Khi chuyển địa điểm thì có thêm các cơ sở mới.
   Trong Java : giả sử ta đã có lớp với phương thức có sẵn để hiển thị 1 chuồi như sau ra màn hình: void ShowName (String str) với chuỗi đã được chuẩn hóa nhưng chương trình mới yêu cầu ta phải hiển thị một danh sách các chuỗi được chuẩn hóa với giao diện mới. 

-Xử lí tình huống : 

   Tình huống 1) Có người để xuất ý kiến ta sẽ mua toàn bộ các cơ sở vật chất đề phù hợp với môi trường mới. Nhưng có một đề xuất khác là ta sẽ sử dụng lại các công cụ có sẵn của công từ và từ đó sẽ thêm các cơ sở vật chất mới phù hợp.
   Tình huống 2)  Một lập trình viên đề xuất , ta sẽ tạo một lớp hoàn toàn mới để ghi 1 danh sách chuỗi với phương thức để chuẩn hóa. Nhưng không, một lập trình viên khác nêu ý kiến: “Tôi có một giải pháp, tôi sẽ sử dụng mẫu chuyển đổi Adapter để tạo một lớp phù hợp từ lớp có sẵn”.

Tạo mẫu Adapter đầu tiên :
Đầu tiên lớp có sẵn của ta được mô tả với  1 interface:

  1. public interface IShowName {
  2.    void showName(String name);
  3. }

Và một lớp thực thi interface trên :

  1. public class ShowName implements IShowName{
  2.    @Override public void showName(String name){
  3.       System.out.println(this.standardize(name));
  4.    }
  5.    public String standardize(String name){
  6.       String resuilt = name.trim();
  7.       return name;
  8.    }
  9. }

Và một interface mô tả phương thức phù hợp với chương trình của ta :

  1. public interface IShowListName {
  2.    void showListName(List listName);
  3. }

Và một lớp thực thi interface :

  1. public class ShowListNameAdapter implements IShowListName{
  2.       private ShowName shownName;
  3.       public ShowListNameAdapter(ShowName shownName) {
  4.          this.shownName = shownName;
  5.          }
  6.       @Override
  7.       public void showListName(List listName) {
  8.          for (String name : listName) {
  9.          shownName.showName(name);
  10.       }
  11.    }
  12. }

Thử chạy mẫu Adapter:

  1. public class TestAdapter {
  2.    public static void main(String[] args) {
  3.       ArrayList array = new ArrayList<>();
  4.       array.add(” Teo “);
  5.       array.add(” Ti “);
  6.       array.add(” Ku “);
  7.       IShowListName adapter = new ShowListNameAdapter(new ShowName());
  8.       adapter.showListName(array);
  9.    }
  10. }

Kết quả chương trình sẽ hiển thị “Teo”, ”Ti”, “Ku” đã được chuẩn hóa.
Đây chỉ là một ví dụ nhỏ của Adapter pattern. Hy vọng bạn sẽ sớm có cái nhìn tổng quát và hiểu rõ thêm về Adapter pattern.

(more…)

Design Pattern – Singleton

Mẫu thiết kế singleton:

Nó là gì?
Mẫu thiết kế singleton đảm bảo chỉ duy nhất môt thực thể của một class được tạo ra và nó sẽ cung cấp cho bạn một phương thức để truy cập đến thực thế đó.
Kiểm soát việc tạo ra các thực thể nhưng có thể lấy ra thực thế.


Dùng nó trong trường hợp nào?
Khi bạn tạo ra một class mà bạn chỉ muốn chỉ có duy nhất một thực thể là thể hiện của class đó và bạn có thể truy cập đến nó ở bất kỳ nơi đâu khi bạn muốn.
Ví dụ như : Khi bạn tạo ra một class làm việc với file, config ,class lưu collection dùng chung, hoặc database . Bản chỉ cần duy nhất một thực thể của class đó và bạn sẽ sử dụng nó ở bất kỳ nơi đâu.
Dùng nó như thế nào?
Đầu tiên tôi tạo ra một class với tên là Database. Để không class nào có thể khỏi tạo nó (đảm bảo duy nhất có một thực thể) tôi sẽ private contructor của class trên.

  1. public class Database{
    private Database();
    }

Và tạo một thuộc tính có tên là INSTANCE có kiểu Database  và một phương trả về thuộc tính đó. Để các class khác có thể sử dụng phương thức này, tôi thêm từ khóa static để biến phương thức này thành phương thức của lớp.

  1. private Database INSTANCE;
  2. public static Database getInstance(){
  3.    if(INSTANCE == null){
  4.       INSTANCE = new Database();
  5.    }
  6.    return INSTANCE;
  7. }

Như trên tôi kiểm tra xem INSTANCE có bằng null hay không. Nếu bằng null thì tôi tạo một đối tượng. Và trả về INSTANCE.
Có một vấn đề xảy ra. Nếu có hai luồng (thread) chạy song song và thực hiện hàm if thì sẽ có 2 thực thể được tạo ra. Để tránh trường hợp này mình thêm từ khóa synchronized. Khi hàm getInstance đã được chạy thì bất kỳ các luồng khác phải đợi hàm này chạy xong mới gọi được.

  1. public static synchronized Database getInstance(){
  2.    if(INSTANCE == null){
  3.      INSTANCE = new Database();
  4.    }
  5.    return INSTANCE;
  6. }

Ok đến đây đã khá ổn nhưng sử dụng từ khóa synchronized đồng nghĩa với việc các luồng có thể phải đợi chờ lâu vì phải đợi luồng đang gọi hạm getInstance chạy xong mới gọi được. Để tránh trường hợp này, tôi sẽ tạo 1 thực thể của lớp Database ngày khi class này được sử dụng, và sử dụng từ khóa final để ngăn không cho thay đổi đối tượng mà INSTANCE trỏ đến  :

  1. private static final Database INSTANCE = new Database();

Lúc này hàm getInstance sẽ trả về đối tượng INSTANCE:

  1. public static Database getInstance(){
  2.    return INSTANCE;
  3. }

Để truy cập đến thực thể của class Database bạn thực hiện : Database.getInstance() lúc này trả về 1 thực thể có kiểu Database.

OK ! Đến đây bạn có thể chắc chắn rằng sẽ chỉ có duy nhất một thực thể của class Database được tạo ra và bạn có thể sử dụng hàm getInstance để truy cập vào thực thế đó. Việc còn lại là bạn viết các phương thức, các setter, getter cho nó. Đây chính là mẫu thiết kế singleton.

(more…)

Simple Guide for 9Path

While I was working on my first Android app, I found 9-patch (aka 9.png) to be confusing and poorly documented. After a little while, I finally picked up on how it works and decided to throw together something to help others figure it out.

Basically, 9-patch uses png transparency to do an advanced form of 9-slice orscale9. The guides are straight, 1-pixel black lines drawn on the edge of your image that define the scaling and fill of your image. By naming your image filename.9.png, Android will recognize the 9.png format and use the black guides to scale and fill your bitmaps.

Here’s a basic guide map:

(more…)

iOS Style – Android Button Resource


Okay, uhm, this is actually going to be a weird post. Everyone who knows me, can admit I’m not a big Apple lover. I don’t hate it, I really like the beautiful designs, a great UI, a beautiful phone, but… it’s Apple, it’s Steve Jobs, it’s the blind making religion that makes lots of people unrealistic. It’s the overall assumption that it’s better than everything else. That’s why I’ll never buy Apple products!

(more…)

9path Button Resource

Using and creating 9-patch images is actually quit simple. Just keep in mind which area is stretched and which area will be repeated. Because I couldn’t find any resources ofor this topic I’ve created some 9 patch images myself. Use it for your own projects. No, I don’t use any licence for this, just use it and make tons of money with it! (more…)